Byrdie.com April 21, 2021
BYRDIE.COM
Hair
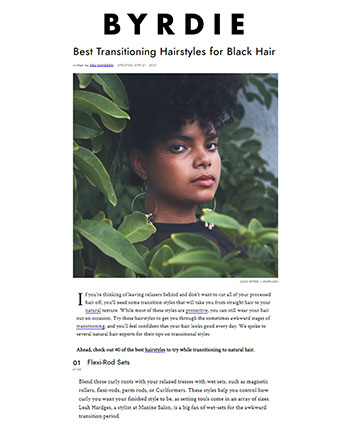
Best Transitioning Hairstyles for Black Hair
If you're thinking of leaving relaxers behind and don't want to cut all of your processed hair off, you'll need some transition styles that will take you from straight hair to your natural texture. While most of these styles are protective, you can still wear your hair out on occasion. Try these hairstyles to get you through the sometimes awkward stages of transitioning, and you'll feel confident that your hair looks good every day. We spoke to several natural hair experts for their tips on transitional styles.
Ahead, check out 40 of the best hairstyles to try while transitioning to natural hair.
Flexi-Rod Sets
Blend those curly roots with your relaxed tresses with wet sets, such as magnetic rollers, flexi-rods, perm rods, or Curlformers. These styles help you control how curly you want your finished style to be, as setting tools come in an array of sizes. Leah Hardges, a stylist at Maxine Salon, is a big fan of wet-sets for the awkward transition period.
First, section out your dry hair and secure it with clips. Because wet sets don't rely on direct heat, they're gentle. Plus, you're getting the hang of making your straightened hair match your textured new growth, which is a healthy way of transitioning.
Next, working section-by-section, apply a hydrating mousse to the hair, brush out, and then wind the strand around the flexi-rod.
Fold the ends of the flexi-rod inward to gently hold the hair in place as it curls. "Twist outs are optimal for this type of careful styling," Hardges adds. "The hair does not need to be held taut for a twist set, and working in sections makes it less likely to tangle."
Keep in place for several hours, then take down the flexi-rods and separate the curls using your fingers.
"The less tension, the better is my rule of thumb when styling hair that is transitioning from relaxed to natural," says Hardges.
Bantu Knots
"Bantu knots are my favorite for transitioning clients to maintain their salon style at home. The roots stay smooth and straight while sleeping or working out, and the ends keep a nice curl without applying more heat," says Hardges.
As with wet-sets, start with dry, cleansed hair that has been sectioned out into the desired size of each knot.
To begin creating the knots, take down the first section and apply any desired hydrating products.
Then, create a two-strand twist (instructions for this at #10) or braid from that section.
Take the twisted strand and begin to coil it horizontally toward the scalp. This forms a tight, secure knot.
Secure the knot by folding the end underneath or using a small bobby pin.
Knotless Braids
More complicated braid styles like knotless braids may require a trip to the salon. You can also get some hair additions if you choose this style to add length and give your braider more room to play. If braids are a go-to style for you, they're perfect for dealing with different textures; they also work with varying lengths of hair, with and without extensions.
Buns/Chignons
Buns, topknots, and chignons are all easy and elegant ways to style transitioning hair.
This is one of the easiest styles to create, but be careful not to get lazy about it: give your hairline a rest from this sleek 'do at least a couple of times per week. This cuts down on the risk of thinning hair around your edges.
Brush your hair back into a high or low ponytail, using some gel or mousse to slick down flyaways. Then, twist your hair into the bun and secure with bobby pins.
Style your edges with a product like Shea Moisture Jamaican Black Castor Oil Strengthen & Restore Edge Treatment ($15) or Creme of Nature Argan Oil Perfect Edges ($5) (avoid alcohol-laden gel that will dry out your mane).
Sew-Ins
For some women, weaving their hair away during transitioning is much easier than styling it regularly.
You can choose extensions that mimic natural hair so that you can get an idea of what your new texture will look like on you.
Twist and braid extensions are easy enough to get from a professional who's qualified in this area.
When worn correctly, weaves cut back on the frustration of dealing with different textures during your grow-out phase.
Roller Sets
Hardges recommends roller sets as "another styling method to reduce heat damage." Stretching the roots without excessive heat is essential to maintaining hair health while transitioning from a relaxer to natural hair.
After washing, section the hair and apply a flexible mousse with a soft hold.
Next, roll each section up into the roller and let it sit. You can blow-dry the hair to speed up the process.
"There are so many types of roller and rods to create as fast or as slow of a curl pattern you desire," says Hardges.
Wigs
Emmy Award-winning celebrity hairstylist, Kiyah Wright, encourages trying wigs:
“Braiding hair under the wig helps keep the heat off the hair, but you have to be sure to put a wig cap on to avoid any friction," Wright says.
"Be sure to protect your hair from the inside of the wig," adds Hardges. "The construction of the wig can create a break around the hairline, so a stocking cap between your natural hair and the wig is absolutely necessary."
Box Braids
“[Braided extensions] are great for those that live an active lifestyle as a trip to the gym will not ruin the style,” says Niani B, a natural hairstylist at Naturalicious Salon.
First, understand the different types of braids:"Box are individual braids that are loose. Cornrows are braids attached to the scalp through the technique of picking up hair at the scalp much like a French braid," says Hardges.
You'll likely want to hit the salon for these, as they are more time-consuming than other styles and require more expertise.
“It is especially important when wearing any protective style to keep the scalp clean and continue nourishing your hair with a moisturizer and oil," says Niani B.
Faux Locs
Faux locs are another transition style that offers up versatility and minimal manipulation.
These are extensions that you can easily install on your own or have done at the salon.
Choose your loc style and section out your hair.
Then, attach the locs at the root, weaving them in to conceal your natural hair.
When cleansing your locs, wrap them in a microfiber towel like the Aquis Performance Drying Technology Hair Towel ($18) for up to 20 minutes to soak up excess water.
Two-Strand Twists
"Two-strand twists are individual twists using the natural hair," says Hardges.
These twists "are typically done while wet with a curl cream or foam."
"Many like to leave twisted once they have dried, or they can be unraveled to reveal a curly set that can be worn for an additional few days," Hardges adds.
“Most new naturals tend to think this style is unachievable with straight hair. However, it can be achieved by simply adding a small rod to the end of each twist to create the illusion of naturally curly hair," says Niani B.
Head Wraps
Head wraps are both stylish and protective. However, you'll want to invest in one with a silk or satin lining to prevent your coils from drying out or snapping due to friction. Scarves and wraps work with any number of the styles from this list.
Marley Twists
We know twisted styles come highly recommended as a protective style. "Marley twists have braiding extension hair added to the individual twists," says Hardges. Adding extensions, as with these super long twists, can help your style last longer.
The Silk Press
“For hair transitioning from a relaxer, it’s important to have the texture of the hair be consistent,” says Michelle O’Connor, Artistic Director at MATRIX. For this reason, she recommends the silk press.
This style is perfect for naturals who won’t rock their natural texture often but will still want to say goodbye to the chemicals.
“[The silk press] can be worn for up to two weeks with a nightly technique of wrapping the hair around the head and tying a silk scarf over it," says O'Connor.
Be sure to protect your hair with a good leave-in and heat protectant like Design Essentials Natural Agave & Lavender Weightless Thermal Protectant Serum ($10).
Flexi-Rod Puff
We love a style that adds a spin on a classic. Here we see how a flexi-rod set, as seen in #1, can be stretched into a braided fringe puff so that you never get bored.
Cornrows
Cornrows are one of the simplest transition styles to try, especially if you know how to braid. This tutorial from natural hair vlogger Whitney White gives you the rundown on a very basic cornrow style:
First, blow-dry your hair to make sure it's stretched out for maximum length.
Next, moisturize with a leave-in conditioner. You may also want to apply a mousse or gel additional hold.
Add a squirt of hair oil to seal in the moisture from the other products.
"Cornrows are braids that are attached to the scalp through the technique of picking up hair at the scalp much like a French braid," says Hardges. Create two large three-strand braids running along the top of the scalp.
With any braided style, be mindful of how much tension you're applying to your scalp.
If you like rocking wigs and weaves to get through a hair transition, you can create cornrows as your base style before slipping on a wig or attaching a weave.
Braided Updo
Braided updo's keep the hair off the face and your transitioning hair protected.
Start by braiding the hair into cornrows following the steps from #15 or having your stylist do it.
Next, twist your braids up into a high bun and pin into place.
Be sure to care for your edges while you're rocking this style.
Short Faux Locs
Faux locs don't have to be long. A short bob makes for a chic, low-maintenance style you can wear for up to six weeks.
Jumbo Braids
Jumbo braids are the perfect box braid style for those who want to spend little time in their braider's chair. To prevent the style from feeling too heavy, try the knotless braiding technique.
Braidless Crochet
Crochet braids are another great option for a transitional style, or you can try a braidless crochet twist, as pictured here.
Hair extensions are affixed to cornrows using a crochet loop.
This creates length and volume while allowing the scalp and natural hair room to grow and breathe.
The resulting extensions can be braided, twisted, or formed in faux locs.
Mini Twists
Mini twists can be time-consuming. However, they can last up to six weeks. Using the same technique from #10 on smaller, tighter sections will create this look. You can wash, condition, and trim them. If your ends are still straight, add a few rollers to the ends.
Braided Crown
Braids are incredibly versatile and can be worn down around the shoulders or piled in an intricate top knot at the crown of the head.
Jumbo Twists
This helpful video tutorial shows you how to create jumbo-sized Marley twists using extensions.
Cleanse and dry your hair.
Section out to your desired twist placement.
Create two-strand twists by first folding the extension, then knotting it onto the natural hair.
Then, using the two sides of the extension, create a two-strand twist.
Thin Locs
Locs don't have to be super long and thick to make a big impact. We love these thinner blonde locs on mid-length hair.
Low Braided Chignon
Beautiful cornrows spiral along the scalp into an elegant low chignon. While it might be a bit more time-consuming than the basic cornrows from #15, the results are stunning for a formal occasion.
Pink and Black Knotless Braids
Transition styles that utilize extensions offer a fun opportunity to play with color without damaging dyes.
Ribbon Detail
Sweet little details like a ribbon or jewels add interest to a braided style. You can ask your stylist to include these accessories or add the ribbon yourself by tying strategically around a single braid.
Butterfly Locs
This style of crocheted locs has a relaxed, slightly lived-in vibe. You install them using the same technique from #19, but the look will be different depending on the extensions you choose.
Curlformers
Curlformers are another unique, heatless way to create waves. Similar to flexi-rods, this is a wet-set style that seamlessly blends your natural texture with your chemically treated strands. Michelle Chea demonstrates how:
Take your Curlformers and the included styling hook. Slide the first Curlformer onto the end of the hook.
Gather a reasonably sized section of hair (too big, and you'll have trouble applying the Curlformer, too small, and the curls may be tighter than you're going for) and mist with water to dampen.
Apply leave-in conditioner and any additional styling products you like to use. Brush through to blend into the hair.
Twist hair at the root, then attach the hook. Push the Curlformer upward toward the root while pulling the styling hook away. This will feed the hair section into the Curlformer.
Pull the Curlformer downward while holding it at the root to get the curl to fall properly.
Air dry or sit underneath a dryer to speed up the drying process. Then remove the Curlformers and shake out your hair, using fingers to separate the curls.
Classic Stitch Braids
Stitch braids are a style of cornrows that follow a neat geometric pattern with clean lines running parallel and perpendicular to the braids. Unless you're an expert, this is a look for the styling chair.
Passion Twist
Passion twists are a hybrid between locs and Senegalese twists created by stylist Kailyn Rogers. They give off a slightly undone appearance that's more boho than standard twists but still easy to maintain. You can get the look with the same steps as #10, adding extensions.
Hair Puff
When in doubt, pile your transitioning curls on top of your head in a chic pineapple puff and call it a day.
Brush a bit of mousse through your hair and pull back into a super high ponytail, securing with an elastic.
Hydrate the ends by applying a leave-in like Shea Moisture Jamaican Black Castor Oil Strengthen & Restore Leave-In Conditioner ($13).
This style also works with wet-sets if your curls are not super defined yet.
Silk Press Topknot
The silk press from #13 creates an excellent base for any number of styles. Here, straight locks are piled into a loose topknot with a few curled strands hanging around the face.
Banded Ponytail
Banded ponytails are such cute and easy protective styles to do at home. We love this pigtail version with a crown braid. To create the ponytails:
Start with dry, cleansed, and hydrated curls.
Separate into two equally sized sections. Without the braids, you'll need to secure each one at the base of the scalp with an elastic.
Space several elastics (3-4, depending on length) down each ponytail, fluffing the hair between them for that bubble effect.
Unraveled Braids
Whether using braided extensions or simply braiding your hair, unraveling a few inches at the ends adds a relaxed, "undone" effect. You'll want to keep your natural hair fully braided for a little while to get those deep waves once you begin to unravel.
Headband Wig
Can you believe that this is a wig? The headband wig is one of the easiest, most natural-looking transitional styles that fully protect your hair.
Follow Hardges' tips for wigs from #7 by braiding your hair and applying a protective cap.
Slide the hairpiece over the cap the way you would a headband, tying it into place.
Fluff out the curls.
You can add a real headband on top to mix up the look.
Braided Bantu Knots
Bantu knots can be braided instead of twisted for a more advanced style.
First, section out your hair and braid each section.
Then, follow the steps from #2 to wind the braids into knots and secure.
Beaded Twists
Beads not only add a funky twist to a head full of twists, they also create a satisfying weight that stretches the hair while it's styled, preventing shrinkage and helping to maintain the length.
Twisted Updo
A pseudo-French twist with curly ends looks so elegant. Simply twist your hair under, using bobby pins to hold the twisted shape in place along the bottom of the scalp. The curls will fall over the forehead, creating a faux bang.
Three-Strand Braid
Simple three-strand braids (using extensions or not) with styled edges are so classic.
Braidout
The results of a braid out can help you meld two textures into one. Look at those gorgeous, voluminous curls!