Better Homes & Gardens September 15, 2020
Better Homes & Gardens
Hair
How to Master An At-Home Blowout, According to Experts
These styling tips will cut your blow-drying time in half.
This is part of our new weekly series called Test Drive, where our team of beauty experts demystify products and tools, as well as explore new techniques IRL.
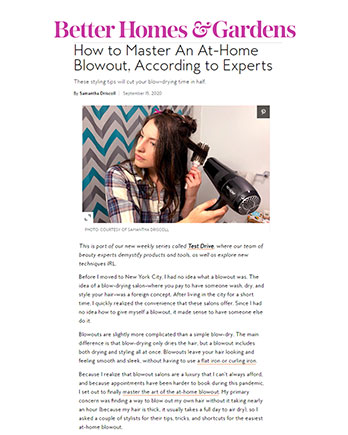
Before I moved to New York City, I had no idea what a blowout was. The idea of a blow-drying salon—where you pay to have someone wash, dry, and style your hair—was a foreign concept. After living in the city for a short time, I quickly realized the convenience that these salons offer. Since I had no idea how to give myself a blowout, it made sense to have someone else do it.
Blowouts are slightly more complicated than a simple blow-dry. The main difference is that blow-drying only dries the hair, but a blowout includes both drying and styling all at once. Blowouts leave your hair looking and feeling smooth and sleek, without having to use a flat iron or curling iron.
Because I realize that blowout salons are a luxury that I can’t always afford, and because appointments have been harder to book during this pandemic, I set out to finally master the art of the at-home blowout. My primary concern was finding a way to blow out my own hair without it taking nearly an hour (because my hair is thick, it usually takes a full day to air dry), so I asked a couple of stylists for their tips, tricks, and shortcuts for the easiest at-home blowout.
1. Towel-Dry Hair
When you get out of the shower, the first step before even turning on your blow dryer is to towel dry your hair to absorb as much water as possible without overly drying the hair. “It’s much easier to manipulate hair when it is wet,” says Leigh Hardges, a stylist at Maxine Salon.
2. Apply a Styling Cream
It may sound hard to believe, but using styling products can actually speed up the blow drying process. “Styling creams will add shine to your hair, facilitate your blow-drying process, and make your hair look healthier,” says Nunzio Saviano, founder of the Nunzio Saviano Salon.
3. Rough Dry Hair
Before sectioning your hair, start by blasting your hair with the blow dryer, focusing on the thickest hair at the back of the head. Once the back of your head is 80% dry, and the hair at the front of your head is no more than 70% dry, you can move onto the next step. “You want to stop before your hair starts to get frizzy and dry, especially around the hairline, because then you’re going to have to rewet it,” Saviano says. Hardges adds that it’s helpful to focus your efforts directly on the scalp, using either your fingers or a vent brush to keep the hair detangled as you dry.
4. Section With Clips
After the rough-dry, you can section your hair off with alligator clips. Hardges recommends one horseshoe-shaped section at the crown to the front hairline and four vertical sections around the head. If you have thicker hair like me, you might need to grab less hair at a time to make sure it can wrap around the brush and still allow for airflow. “If a section is too thick, the air won’t penetrate from the blow dryer, and it’s going to take longer to fully dry your hair,” Saviano warns.
5. Start at the Front of Your Head
You should always start drying the front and working your way to the back because the front hair starts to get frizzy much faster since it’s not as thick as the hair at the back of your head. Then for the hair at the back of your head, start by drying the bottom layers of hair so you can clip your wet hair out of the way.
6. Leave Space Between the Blow Dryer and Your Brush
With every piece of hair, you want to start drying the roots first and then move your way towards the ends of the hair. Hold the round brush in one hand under the section of hair you are drying and position the blow dryer facing the hair with your other hand (the hair will end up between the brush and your blow dryer). Gently roll the brush down as you hold the blow dryer to your hair, making sure to leave at least a half-inch between the blow dryer and your brush at all times. “You want the air to escape so it won’t get too hot and burn your hair,” Saviano says. For textured hair, Hardges recommends keeping a water bottle handy in case your hair starts to dry out. Then, you’ll stretch your curls with a round brush and start blow-drying in a downward motion using medium tension. “When you are done, turn the heat to the coolest setting and brush down through the hair to help smooth and dry any leftover water droplets that like to hide in curly hair,” she says.
7. Try a Blow Drying Brush
If you feel uncomfortable holding both a blow dryer and a round brush, you can try using a blow drying brush like the Easy Blo: One-Step Dryer and Volumizer that Hardges recommends. Blow drying brushes make round brushing much simpler—and cut drying time in half—by combining a blow dryer and a brush in one. “The different size bristles give great tension, and it’s very lightweight so you get the salon-style volume minus the muscle fatigue,” Hardges says.
8. Finish With a Cool Shot
A blast of cold air will help set the hair after all of your hard work blow-drying. “Cool air gives shine and longevity to the style,” Hardges says. “Flip your hair over and use a cool low setting on the hairline and scalp to make sure your hair is 100% dry.” I found this tip to be super helpful because it helped me find a patch of semi-damp hair that I overwise might have missed.
9. Apply Finishing Products
Let your hair cool completely before touching it, otherwise, you might end up causing static and frizz. “When the hair is completely cooled down, it’s safe to add some spray or finishing cream,” Saviano says. As for extending the length of your blowout? The fewer products the better so your hair can stay clean longer, but dry shampoo will help you go an extra day or two between shampoos.
It took me a couple tries to master the round brushing technique (and I will admit that using a blow drying brush was 10 times easier than using a brush and a blow dryer), but I was pleasantly surprised by the results. I found that by applying these tips, it doesn’t take as long to dry and style my hair. Here are the products that worked best for me!
Microfiber Scrunchies
These scrunchies absorb excess water from wet hair, making them the perfect post-shower accessory to tie your hair back with. I have thick hair, and I’m always surprised by how much water these scrunchies absorb! I use both scrunchies at once, tying up the top half of my hair with one and the bottom half with the other so my hair dries faster.
Styling Cream
This styling cream helps protect your hair against frizz and heat damage. For my thick, wavy (and sometimes unruly) hair, it also helps the round brush glide through my hair without pulling or tugging. Before blow-drying, I rub a quarter-sized amount onto my hair and gently comb it through the ends to make sure it gets distributed evenly.
Heat Protecting Spray
If you’re not a fan of styling creams, there are also plenty of sprays and mists to choose from, like this heat protecting spray from L'Oréal. This primer is formulated to actually reduce blow-dry time while protecting against heat damage (a win-win). After towel-drying your hair, spray it onto your hair from about six to eight inches away from your head. I don’t always love using a ton of products before heat styling because they can sometimes leave a sticky feeling, but this spray leaves my hair feeling clean.
Sectioning Clips
Ask any stylist: the key to blow-drying your own hair is to work in small sections so you don’t try to wrap too much hair around your brush. These clips are perfect for sectioning my hair off before I blow dry. I find it helpful to buy two packs and use all eight clips at once since I have thick hair and need a lot more sections. But the four clips in one pack will be more than enough if you have thin or short hair.
Round Brush
The boar bristles in this brush add shine and eliminate frizz, while being gentle on your hair. The barrel is vented to maximize airflow, making sure that your hair dries evenly. Because it is ceramic, the barrel will also heat up as the hot air hits it, which helps my hair curl to the curve of the brush. Depending on the length of your hair, you will need to use different sized brushes. “The longer your hair, the bigger the brush you need,” Saviano says.
Blow Dryer
Stylists recommend buying a blow dryer that ranges between 1800 and 2200 Watts. This 1875 Watt Conair dryer comes with temperature and airspeed controls that you can alter depending on your hair type. “If you have very fine hair, you are going to want to set the heat to medium, but you can use a high airspeed for regular use,” Hardges says. Saviano adds, “the thicker your hair is, the more powerful a blow dryer should be.” He also advises keeping the nozzle attached to the blow dryer because it concentrates the air and makes it more powerful, allowing for a quicker dry.
Hair Oil
“Blow-drying can often leave the ends of your hair parched, especially for textured hair, so I suggest using an oil before and after a blowout,” Hardges says. The Argan, Procaxi, and Maize oils leave your hair soft, shiny, and hydrated while preventing breakage and fighting frizz. Squirt two pumps into your palms and then apply the oil to the ends of your hair before or after your blow-dry.
Texturizing Spray
If you don’t have textured hair, a finishing spray can help add volume and body. This spray helps separate your hair to create a fuller look, while also helping to set your hair after you’re done blow-drying. To apply, shake the can and the spray about four to six inches away from your hair.